How to Connect to Exchange Online PowerShell Module Fast?
If you are someone who does not know how to connect to Exchange Online PowerShell module, you are at the right place. Here, I will teach you exactly what steps to take to download, install, and link with the Exchange Online’s PowerShell environment.
Without further ado, let’s jump right into understanding the features of the Exchange Online PowerShell module and why admins should use it.
Why Install the Exchange Online PowerShell Module?
Being able to connect directly to the Exchange Online environment from a PC helps admins in many ways.
The ability to use PowerShell cmdlets effectively is what makes an admin the go-to IT source inside an organization. Moreover, as PowerShell is universally applicable, it does not matter if you switch between Mac, Windows, or Linux; your skills remain useful no matter what.
Everything from user management and license assignment to the creation and deletion of calendars, groups, contacts, and much more becomes super quick.
Also Read: Which One to Choose Between Exchange Online Plan 1 vs Plan 2
No longer do admins have to find the exact setting through a vast array of confusing menus.
Admins get freedom from navigating through a vast array of confusing menus. Just a few lines of cmdlets can perform a task in seconds that would have otherwise taken quite a while if attempted via the UI portal.
Admins who know how to install the Exchange Online PowerShell Module can automate repetitive tasks like license assignment for new joiners. Transforming employee emails into shared mailboxes to cut down subscription costs.
However, all of this is only possible if you have the right tools. So let’s see what they are.
Do This Before Installing the Exchange Online PowerShell Module
You need to do this to ensure that your PC/workstation can install the module and run the PowerShell module.
Check the existing PowerShell version.
Although you can use the Windows PowerShell 5.1 version, which is built into all PC’s running Windows 10 or later. It is better to use the newer cross-platform PowerShell 7.4.0 or later. This becomes mandatory if you plan on running the module version 3.5.0+, which has .NET 8.0 dependencies.
For running any command, it is preferred that you launch PowerShell in admin mode.
Press Windows + R > Type pwsh > Press Ctrl + Shift + Enter. Then, tap Yes in the dialog box.
Once the PowerShell window is live, type cls to clear any unwanted text. Then the first real command you type is:
Set-ExecutionPolicy RemoteSigned
It transforms the PowerShell window to an elevated permission set.
Check Out: What to do if your mailbox has been temporarily moved to the Microsoft Exchange Server?
After this, install or update the PowerShellGet module.
Install-Module -Name PowerShellGet -Force -AllowClobber
Close this PowerShell instance, and reopen it with the same elevated privileges.
Also, check if you have .NET installed or not. If installed, make sure that its version is at least 4.5. Higher versions are preferred.
How to Install to Exchange Online PowerShell Module?
Admins of the organizations that have recently made the switch to an Exchange Online Plan want to learn how to connect to Exchange Online PowerShell. They must first have the correct module installed. So that’s what we are going to teach you.
To install the ExchangeOnlineManagement module, open PowerShell in admin mode and paste:
Install-Module -Name ExchangeOnlineManagement
This installs the module for all users. There is also a filter with which you can limit installation to the current user. Append “-Scope CurrentUser” at the end of the same command.
After installation completes, verify with the help of:
Get-Module -Name ExchangeOnlineManagement -ListAvailable
How to Connect to Exchange Online PowerShell
To connect, use:
Connect-ExchangeOnline -UserPrincipalName youradmin@domain.com
Replace the placeholder “youradmin@domain.com” with the actual name.
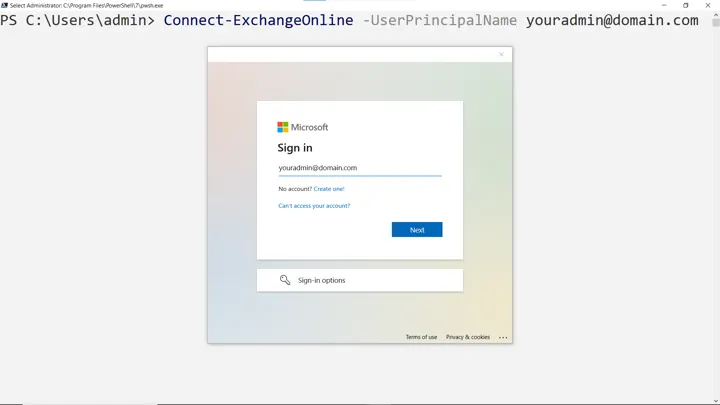
You will see a login box, type in a credential, decide how much control over the device your organization should have, and start using the Exchange Online PowerShell module.
If you are mainly using the module for automation, then it is better to authenticate the account via a certificate. The cmdlet will also change a bit and look like:
Connect-ExchangeOnline -CertificateThumbPrint "Thumbprint" -AppID "AppId" -Organization "contoso.onmicrosoft.com"
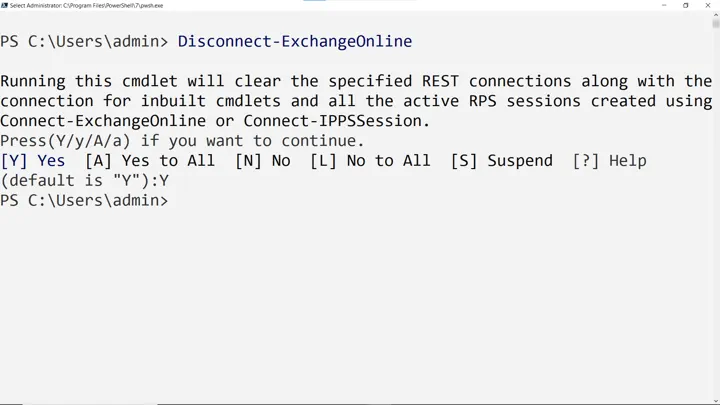
Once done with your work, close the session to prevent misuse. Use:
Disconnect-ExchangeOnline
Seeing all this, you might think it’s too simple to install and use the module. However, that is not the case; there are a lot of errors you can encounter based on how your existing environment is set up. We have tried to cover all major pain points.
Troubleshoot the Installation Process
- Error: “Cannot find cmdlet Update-Manifest”: Ensure PowerShellGet is installed and updated.
- WinRM Errors: On Windows, enable WinRM if using basic auth (though modern auth is preferred).
- Module Not Found: Restart PowerShell or check your module path with $env:PSModulePath.
- Compatibility Issues: If on an older OS, downgrade to a compatible module version (e.g., 3.4.0 for PowerShell 7.2).
Conclusion
Here, we saw what needs to be done if you don’t know how to install the Exchange Online PowerShell module. The process is fairly straightforward. First, you check if your machine has the minimum requirements or not. Then, follow by completing all the necessary prerequisites, like the availability of a PowerShell instance running in admin mode to avoid system stops, checking the latest version, and seeing if the version that you have is the same or different.
Type Install-Module -Name ExchangeOnlineManagement and let the installation complete. Finally, with Connect-ExchangeOnline to use the necessary cmdlets.