Manage Linked Mailbox Delegation in Exchange 2013 Server
In this article, we are about to discuss ‘how to manage linked mailbox delegation in Exchange Server 2013’? No doubt, multiple users allow using Exchange admin center (EAC) for granting full access to mailbox Exchange 2013 which allows them to view or send messages from another mailbox. However, mailbox permission can be assigned into multiple ways such as user mailboxes, resource mailboxes, linked mailboxes and shared mailboxes. Out of them linked mailboxes might be necessary for an organization that deploy Exchange in a separate resource. Also, a user able to assign permissions into groups allowing delegates to send messages on behalf of the group.
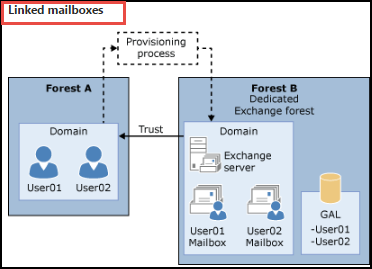
To illustrate the figure depending on the relationship between using linked user account to access the linked mailbox and keep disabled user account in the Exchange resource associated with linked mailboxes.
Points to Manage Mailbox Delegation by Permissions in Exchange 2013
In the following section, a user can assign delegates permissions for accessing mailboxes or send mailboxes in Exchange 2013 are mentioned for mailbox delegation:
#1 Full Access
This permission allows a mailbox delegate to sign in to users mailbox and to access the entire contents of the mailbox. After this, Exchange 2013 full access permissions not working due to the delegate to send email from the selected mailbox. Also, a user has authority to assign the delegate either Send As or the Send on Behalf permission for sending the emails from the user’s mailbox. While configuring permissions for groups it can’t be available in it.
#2 Send As
This permission permits a user other than the owner of a mailbox to send messages. After assigning the permission to a delegate and then, any message that a delegate sends from particular mailbox will be appeared as if it was sent through mailbox vendor. However, this permission unable for a delegate to sign in and open the user’s mailbox.
#2 Send on Behalf
Also, this permission allows a delegate to use this linked mailbox to send multiple messages. Nevertheless, after this permission has assigned to a delegate, then in any message From address is there it indicates that the message was sent by a delegate on the behalf of an owner of the mailbox.
After considering to assign permissions to linked delegates, select Add. Under to display the appropriate permission then, Select Recipient page, which helps to show a list of all recipients in users Exchange organization that must be permission assigned. Now, select the recipients a user want to assign delegate permissions, add them to a list, and then click on OK button. After this, a user can also search for a specific recipient by entering the recipient’s name in the text box and press Search option.
Using Shell to Manage Mailbox Permissions Exchange 2013 Properties
A user allows using Get-Mailbox and Set-Mailbox from the command prompt to view and then, change the properties for the linked mailboxes. One more advantage while using the Shell that is able to change the properties for multiple linked mailboxes. To know more about what parameters corresponding to mailbox properties, view the several points:
- Get-Mailbox
- Set-Mailbox
Here, there are multiple examples of using the shell to manage linked mailbox delegation by using Exchange 2013 attributes.
#1 In the Organization, use Get-Mailbox command to search all the linked mailboxes. Let as below example:
![]()
#2 The below example using the Set-Mailbox command to allow the limit the number of recipients on the To:, Cc:, and Bcc: lines of an email message to 500. This range is applied to all linked mailboxes in a Company.

Next, the example to change the linked master account that is associated with a linked mailbox in an Exchange 2013.

Once it is done successfully, a user needs to verify the change properties for a linked mailbox, do the following actions:
- From EAC, select the linked mailbox and choose Edit to view the property that a user has changed. Depending on the changing property, it might be viewed on detailed screen for the selected mailbox.
- Within Shell, use the Get-Mailbox command to verify the modifications. One such benefit of using the Shell is that a user able to view several properties for multiple linked mailboxes. The following command will verify the new value.

To verify the new value by running the following command:
![]()
Conclusion: Manage Mailbox Delegation
After discussing brief description related to Exchange 2013 Mailbox delegation, the article focused on managing linked mailbox to user mailbox Exchange 2013. We have explained several ways related to Exchange 2013 full access permissions by using properties of shell script in a proper manner.