Set up Exchange Email on Android Phone the Right Way
For IT professionals and organizations, knowing how to set up Exchange email on Android devices is essential for maintaining always-on connectivity.
In fact, according to the latest estimates, nearly 50–60% of emails are now being opened on mobile first. This is because doing so helps professionals reduce the risk of missing important messages while in transit.
Moreover, adding a bridge between your organization’s on-premises Exchange and your Android phone is not that difficult. Technically speaking, all you need is a full email address, password, and the correct server information.
By possessing all that information and following this guide, you will be able to complete the configuration in no time.
Here we’ll cover not only the account settings you’ll need for a fast Exchange to Android connection but also reveal common troubleshooting tips. Let’s start by listing all the reasons to add Exchange to Android.
Why Set Up Your Exchange Server Account on Android?
If you add your workplace Exchange Server ID to your daily use device, then you can stay connected to all important updates anytime, anywhere. Here is a list of reasons that many of your peers have reported and may even apply to you.
- Instant Email Access: The biggest benefit is no doubt the ability to respond to work emails from the palm of your hand. You need not be at your workstation to stay in the loop regarding the latest developments at your workplace.
- Sync All Devices: It only helps if all your devices are in direct sync with each other, and having an instance of your Exchange account on mobile helps with that. Moreover, it’s not just emails, but all of your contacts, calendars, and tasks also update in real time.
- Use Push Notifications: Having an Exchange on an Android app allows you to use push notifications to gain instant alerts for any new meetings, calls, or collaboration requests.
- Remote Offline Access: If you are in a place where network coverage is questionable, even then, you would have access to all historical Exchange email messages right inside your phone.
- Secure & BYOD-friendly: Being able to use personal mobile devices makes the workplace user-friendly and also saves hardware costs for the organization. Moreover, this is possible only because IT admins can enforce strong password rules, apply encryption, and remotely wipe devices without interfering with the user’s personal data.
Now that I have told you about the most common causes, let us see what data you need to get started.
Data You Need to Set up Exchange Email on Android Phone
Before you join the two platforms, you must collect all the important details. These are often given to you by your IT administrator, so contact them. Here is a list of items you must have:
- Email address or Domain\Username: This is a unique value with the typical syntax that looks something like this: yourname@company.com. Sometimes you may have to add a prefix domain, so keep that in mind.
- Password: This is the same credential you use to connect to the Exchange Server via Outlook. Make sure that you type every character correctly.
- Server: As we are connecting to the on-premise server, this detail becomes critical. The default naming scheme is mail.yourdomain.com; however, you must verify with your admin.
Other minor details are also used similarly to when you perform a Microsoft Exchange Server setup on an iPhone are as follows:
- Port Number: 443 for unencrypted and 993 for encrypted
- Security Type: SSL/TLS is the standard nowadays; contact your admin to get the correct value.
- Outgoing (SMTP) settings: This is an important parameter that follows this format: smtp.yourprovider.com, the default port number is 587.
These details allow your Android phone to synchronize not only the emails but contacts and calendar as well.
Set up Exchange Email on Android Via Device Settings
All Android devices have a similar UI, so these steps will work regardless of your device brand.
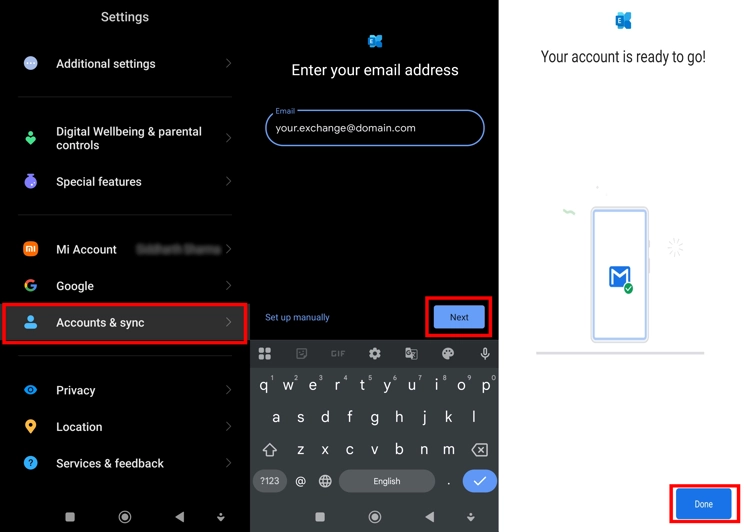
- Step 1. Open the phone’s Settings menu.
- Step 2. Tap Accounts & sync.
- Step 3. Tap the Add account option.
- Step 4. Choose “Exchange” from the list of options.
- Step 5. Type your Email ID details, then press Next. Your phone may pull all details from your server. If it doesn’t, choose the Set up manually option at the bottom left corner.
- Step 5.1. On the manual setup screen, add all the details you got previously. Then, press next.
- Step 6. Continue with the on-screen instructions till your Exchange account is added to your Android device.
However, we still can’t access the actual emails themselves. For that, we must use an email app, and the first choice for all Android users would be Gmail.
How to Add a Microsoft Exchange Server on an Android Phone Using Gmail?
Follow these steps and set up Exchange email on Android for free.
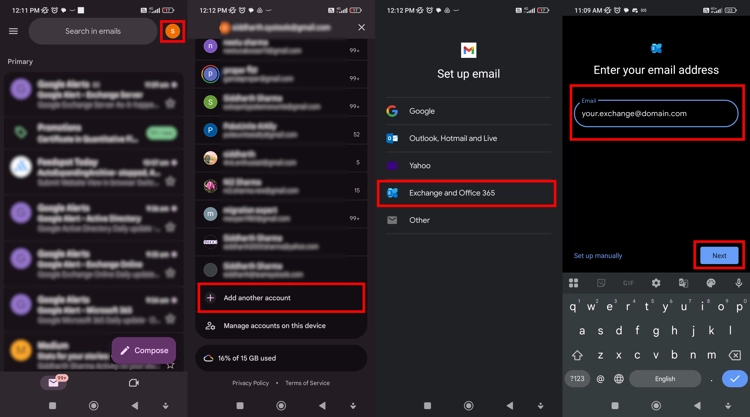
- Step 1. Open the Gmail app.
- Step 2. Tap ☰ > Settings > Add account > Exchange and Office 365
- Step 3. Then, enter your email, press Next, type your password, and press Next.
- Step 4. Pick Exchange (not Outlook/Google). Otherwise, the contacts/calendars won’t sync.
- Step 5. Should you see an “Outlook wants to redirect” message, tap OK to allow it. Moreover, during the setup, if the device is not auto-filling the details. Tap on manual setup and use the server details you got from the IT department, and tap Next.
- Step 6. Activate the device administrator to enforce the internal security policies of your organization. Press Activate or OK.
- Step 7. Finally, you may see a notification “Action required to sync email.” If this happens, tap it and choose the “Use another mail app instead” option. After that, name this account ”Exchange Workmail” and press Done.
Gmail is not the end-all, be-all; you can use Outlook, too.
Set up Exchange Email on Android Phone Using Outlook App
The steps remain largely the same. Some people prefer Outlook over the default email app or Gmail because of its similarity to the desktop client. These steps will help you add an Exchange Server account to your favorite Android device email app.
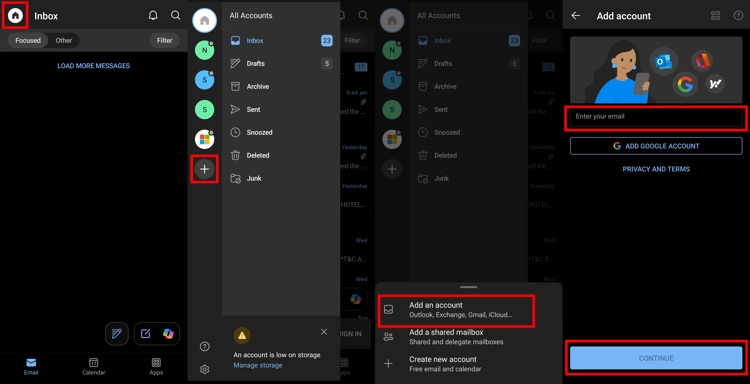
- Step 1. Install/Open Outlook on your Android phone
- Step 2. Tap on get started(if this is your first time using Outlook on mobile) or tap on ☰ > Settings (gear icon) > Add Account > Add Email Account.
- Step 3. Type the Exchange email address and tap Continue. Then type Sign in. Let the app auto-configure all details for you. If it fails, only then should you opt for a manual setup. Like in Gmail, here too you might have to complete the necessary security steps.
- Step 4. Once done with the setup, tweak the sync options to your liking or continue using the app with the default settings.
Also Read: How to Migrate Exchange Contacts to iCloud?
Despite how straightforward these steps are, you might not always complete the setup smoothly. Sometimes, unwanted and unpredictable hurdles put an indefinite pause on the configuration. If something like that is preventing you from joining your Exchange ID to your mobile, check out our troubleshooting guide.
Troubleshoot Exchange Setup on Any Android Device
Incorrect settings or passwords, most likely due to a typo, are common mistakes that are often overlooked. So always double-check every entry before proceeding.
Server connection showing not available is another reason why your task to set up Exchange Email on Android takes more time than usual. So before you start, do a speed test and if possible, avoid mobile data and use Wi-Fi till configuration completes. Slow networks are also the reason why, even after a correct setup, you don’t see any emails on the app.
Security prompts were not activated at the time of configuration. If you skipped over the device security acknowledgment screen during the configuration, or the admins add new or update existing protocols, you may have to go to the device settings and enable the Email or Outlook app as a device administrator.
Admins should download all Exchange Server data in a secure offline location before allowing the users to set up their devices. For that, the SysTools Exchange Server Exporter is the best choice.
Get your copy today.
Conclusion
Here I showed you that the process to set up Exchange email on Android takes just a few minutes once you have the right details and steps. Whether using the built-in email client or the Outlook app, Android makes it easy to stay connected to your corporate inbox on the move.
Frequently Asked Questions
Q. I can’t find any Accounts & sync option on my Android. What to do?
Depending on the Android device, the exact name might be different. If you don’t see any Accounts & sync option, look for other options like Accounts and backup (or Passwords & accounts on some devices).
Q. Despite multiple tries, I still can’t add Exchange to Android. How to Fix?
The most likely scenario is that your IT admin could have put in restrictions on external device connections. So while you are performing the setup pause for a while on the manual setup screen, there exists a mobile device ID number (at the bottom end of the screen). Share this with your admin so they can allow an external connection to it.
Q. Which is the best way to set up Exchange Email on Android?
This is highly subjective. Some users prefer Gmail, others are happier to use Outlook. Choose a platform that is more familiar to you and add your account there. You may even add Exchange to multiple platforms. Thanks to its ability to remain in sync, you won’t feel any difference whatsoever.