Error 550 5.7.1 Unable to Relay Exchange 2016
In this write-up, we are going to discuss Error 550 5.7.1 Unable to Relay Exchange 2016 & 2010. Many Exchange Administrators configure the receive connectors during the installation time of the Exchange Server.
Thus this becomes quite a common scenario in many Exchange Environments whose solution is needed ASAP.
How to Identify Unable to Relay Error?
You will see Error codes 550 5.7.1, 5.0.0, 5.7.3, and 501 5.7.1. All these codes indicate an unable-to-relay error. Another identification method is when you see a lot of mail waiting in the sending area. This means that your Mail.que is too big and might corrupt if no action is taken.
Cause of Error 550 5.7.1 Unable to Relay
There are the following reasons which may lead to the error:
- When email couldn’t be delivered to the receiver’s mailbox.
- When the receiver server does not support relays for receiving mails we can say that the receiver server has restricted send’s domain.
- Another reason could be the mailbox corruption of the Exchange server.
Instant Solution: To recover severely corruption Exchange database file users can use the SysTools Exchange EDB File Repair Tool which provides scan mode option (Quick & Advance scan) which recover corrupted Exchange mailboxes and EDB file with no data loss without using any command. This utility export the healthy & recovered mailboxes directly to the Live Exchange Server, Office 365 and multiple file formats. Also, users can export EDB to PST, EML, MBOX, PDF, HTML, MSG file in a simplified manner.
Download Now Free Purchase Now 100% Secure
Fix Error 550 5.7.1 Unable to Relay
Now I am about to describe the solution to fix the error Error 550 5.7.1 Unable to Relay for Exchange server 2016, 2013, 2010, 2007, & 2003. You have to allow relay access permissions for all recipients in the Exchange Server.
Fix Error in Exchange Server 2016
In Exchange 2016, we have to first create a New Receive Connector in the Exchange Server. Just run the below-written command in Exchange Management Shell (EMS) to create a new receive connector.
New-ReceiveConnector -Name 'rconnect' -Usage 'Custom' -Bindings '10.12.12.1' -Fqdn 'win10.mailtest.com' -RemoteIPRanges '0.0.0.0-255.255.255.255' -Server 'Win10'
In the above command:
rconnect is the new receive connector name
Custom is the type of usage
Next to Bindings, the IP address is written
win10.mailtest.com is a Fully Qualified Domain
Next to RemoteIPRanges, the dynamic range of the IP address is written
Win10 is the Server Name.
After the Successful execution of the above command the New Receive Connector will be created with the name of rconnect.
Now we have to add permissions to the Access Control List of Receive Connector which will allow anonymous users to access the relay of the receive connector. And user will not get Error 550.5.7.1 Unable to Relay.
Run the Below written command in Shell to add the permission:
Get-ReceiveConnector "rconnect" | Add-ADPermission -User "NT AUTHORITY\ANONYMOUS LOGON" -ExtendedRights "ms-Exch-SMTP-Accept-Any-Recipient"
Where:
rconnect is receive connector name
NT AUTHORITY\ANONYMOUS LOGON is the anonymous user which is the same by default.
You can also run the above-written command to add permissions for anonymous users in already configured receive connectors.
These same steps work for the 2019 version as well.
Fix Error in Exchange Server 2010
In Exchange 2010 first Create a New Recieve connector in Exchange Server.
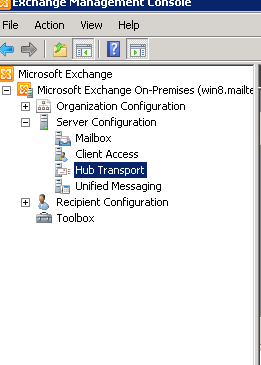
- Go to the Exchange Management console (EMC) through the Start Menu.
- In EMC expand Microsoft Exchange On-Permises then Expand Server Configurations and then click on Hub Transport.
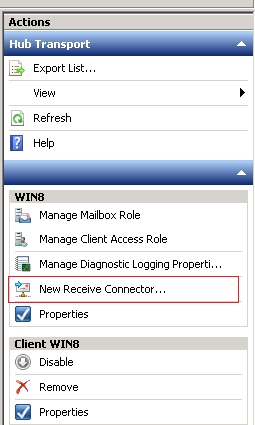
- Now on the right side in Action Pane click on New Receive Connector.
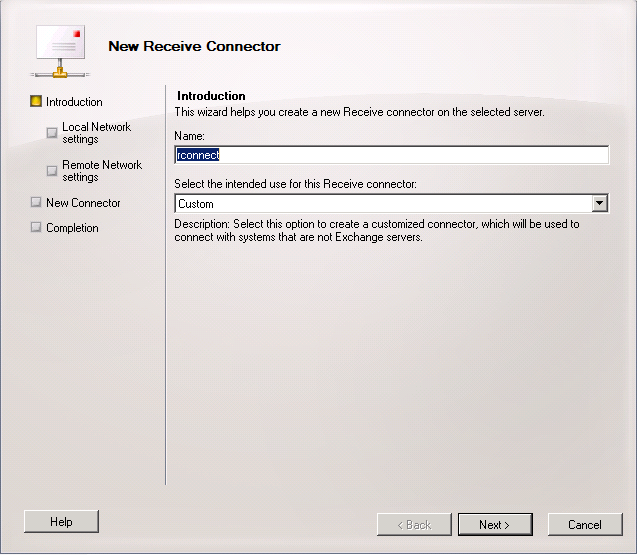
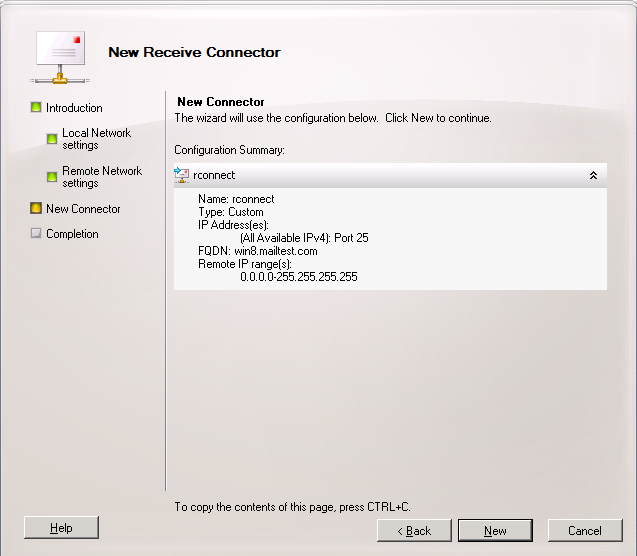
- Now you will see the new receive connector wizard. Just enter the New Name of the Receive connector in the Name text box and hit the Next button.
- Now Check the Port Number Enter the Fully Qualified Domain Name (FQDN) and hit the Next button.
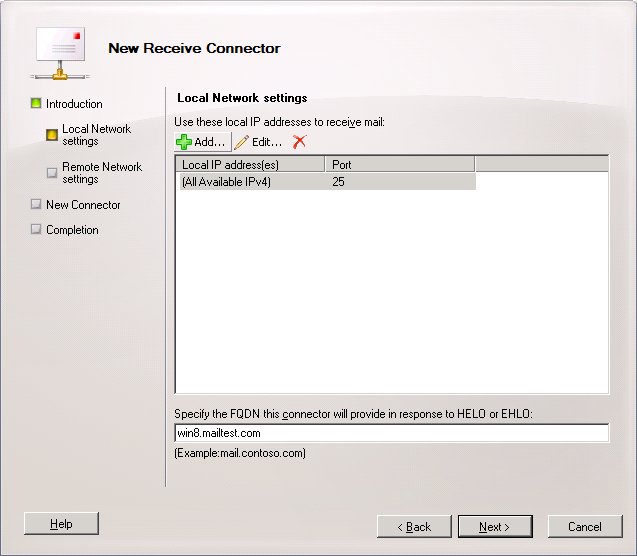
- Now check the IP address or you can enter a new IP address by clicking on the + button. After entering the IP address hit the Next button to proceed.

- Now hit the New button to create a new Receive Connector.
Now After the successful Creation of the new Receive Connector, we have to add permissions for anonymous users. in Access Control List (ACL). Therefore, just run the below-written command. After execution of this command, the Access Control List would be able to relay access to anonymous users.
Get-ReceiveConnector "rconnect" | Add-ADPermission -User "NT AUTHORITY\ANONYMOUS LOGON" -ExtendedRights "ms-Exch-SMTP-Accept-Any-Recipient"
Once you run this command you should no longer see the “error 550 5.7.1” Unable to relay message pop up any time soon.
Troubleshooting Tips and Best Practices
The resolution steps are neither exhaustive nor a 100 % guarantee of fixing the error. So if performing all the steps your 550 5.7.1 Unable to Relay” error persists you may require additional troubleshooting tips.
Check Mail Queue
As we saw earlier if too many messages are stuck mail queue it is a symptom of relay restrictions. Scan through the Exchange Toolbox for legacy servers, or use the Get-Queue on newer versions to see the current status.
If there are too many messages still pending manually remove them or reset/refresh the queue via this command.
Retry-Queue <QueueName> -Resubmit
Verify Permissions
Even when the receive connector is correct the issues within Access Control Lists (ACLs) may trigger an indefinite pause in the relay.
So check the real connection via
Get-ADPermission -Identity “rconnect”
At the same time see if “NT AUTHORITY\ANONYMOUS LOGON” has the correct extended rights, like ms-Exch-SMTP-Accept-Any-Recipient.
To Prevent this issue in the future
- Place a strict limit on relay permissions to work with pre-trusted IP addresses only.
- Always use a secure authentication (TLS) for mail relay.
- Keep an eye on mail queues and review connector configurations.
- Perform backups of your Exchange server and databases on a regular basis.
Conclusion
In this article, we discussed how to resolve the error 550 5.7.1 Unable to relay. We discussed the reason for the occurrence of this error and the way to resolve it. We made a new receive connector for demonstration in Exchange Server 2016 & 2010. You can use either of the two Exchange Management Shell Commands in the case of Exchange 2016 or Exchange Management Console in the case of Exchange 2010.
After the creation of the New receives connector, you can execute the shell commands for assigning anonymous permissions to the Receive Connector. Exchange Admin can also execute this command for already configured receive connectors.
At last, we can say that the error can be resolved by adding permissions to receive connectors.
Frequently Asked Questions
What role does the Receive Connector play in this Exchange Server being unable to relay error?
Receive Connector (s) are a built-in feature of Exchange Server. These components are responsible for how the server interacts with a message, i.e., mail acceptance, server/client connection, and the IP range that can relay messages over it.
If during the setup stage, any user end mistakes are overlooked the receive connector may treat every message as a threat and display a “550 5.7.1 Unable to Relay” error.
How do incorrect DNS settings result in a 550 5.7.1 type of error?
DNS configuration has many different components like MX records, FQDN, etc. If any of the underlying parts are incorrect or unresolved at the time you start using the Exchange Server it won’t be long before you start seeing the 550 5.7.1 error code.
When do I use the ‘NT AUTHORITY\ANONYMOUS LOGON’ to fix relay permissions?
This is the term you add to the Exchange server so that it can process anonymous user accounts without any authentication requirement.
This can be a way to reduce the instances of being unable to relay errors as it helps your Exchange Server bypass one of the major underlying causes.